MSS Stats Class
Hosted by
San Juan Shooting Range
Montrose, Colorado
May 29, 1993
MSS Stats Class
Copyright © 1993 Ian Fachie
All rights reserved
Contents
Planning
Installation
Match Setup
Backup Strategy
Data Entry Routine
Printing Results
Slave Data Entry
Planning
Calculation of Score Sheet Throughput
For a stats officer, planning begins with calculating how much work there is to be done during the match. To a large extent, the resources required to score a match depends on the required throughput of scores. In other words, how thick and fast will the score sheets be arriving?
Multiply the number of competitors by the number of stages. Divide this number by the number of shooting days for the match. That's an average of how many scores you must process in a day.
Remember, processing includes:
·
Collecting ·
Entering
·
Separating ·
Verifying
·
Adding up totals ·
Sorting
·
Checking ·
Filing
To calculate the throughput per hour, divide the daily throughput by the number of hours you have available to process score sheets. Don't make the mistake of including the time before the first batch of score sheets arrives. e.g. If shooting starts at 08:00, but the first batch of score sheets arrives at 10:00, then don't include the two hours between 08:00 and 10:00 in your calculations.
Even though there may be multiple stages on one score sheet, you still have to do most of the above operations on each stage. For simplicity, use the same formula and bank the extra time it will give you.
Examples
1. 100 competitors in a 10 stage match over 2 days.
Throughput  score sheets per day.
The match starts at 08:00 each day. Score sheets are delivered every 2 hours, so your first batch arrives at 10:00. You want to have finished handling score sheets by 20:00, which gives you about 10 hours each day to process the scores. That works out to about 50 score sheets per hour, or less than one a minute. This is quite comfortable and can probably be managed with one computer.
2. 200 competitors in a 15 stage match over 3 days.
Throughput  score sheets per day.
Assuming a 10 hour day (from 10 am to 8 pm), that's about 100 score sheets per hour, or just over 1½ score sheets per minute. This is about the maximum for one computer.
3. A 5 day match with 300 competitors and 30 stages. Some score sheets have more than one stage on them.
Throughput  scores per day.
Again, assuming a 10 hour day that's about 180 score sheets per hour, or 3 score sheets per minute. This probably can't be done on a single computer.
Note: The processing time in the above examples does not include time for printing results, making backups, etc. Even when you make use of Queued Printing (described later on), the time taken to print results at the end of the day can easily add 2 hours or more to your working day.
Determine the Resources Required
Now that you know how much work there is to be done, you can plan the resources required to do it.
Human
·
Scorekeepers
Try to get people who can write legibly and who are reasonably competent at filling in forms (that's what a score sheet is). Dedicated scorekeepers are preferred in large important matches.
·
Score sheet collectors
Use people who are specifically authorized to collect score sheets. They should check to insure that all score sheets for each squad are present, including the no-shows.
·
Stats officers
Must know how to score a match. Should have a good knowledge of IPSC rules, basic computer skills, and a working knowledge of the MSS. In large important matches, use certified stats officers if possible.
·
Data entry people
People who are good at the keyboard. Balance speed with accuracy (just like in IPSC shooting!). They should be familiar with the MSS, but data entry skills are more important.
·
Casual help
People who can help with adding up scores, sorting and filing score sheets etc. They don't have to know anything about IPSC matches, computers or the MSS.
Hardware
·
Computers
Get the fastest computers you can, with a fast processor and a fast hard disk. If you are using multiple computers, make sure you have enough data entry people to put them to good use.
·
Printers
The fastest you can find. If you are using multiple computers, try to get a printer for each one. Ideally, the printers should be about equal in speed, but the more you can use, the better. In large matches, printing can take a long time, especially at the end of the match.
·
Paper
Have enough paper on hand to feed all of the printers you will be using. Large matches can use up quite a lot of paper, depending on how often you post results. The following tables show approximately how many pages of paper are required to print stage and match results twice a day.
Three day match Five day match
| |
Competitors |
|
|
Competitors |
|
Stages |
100 |
150 |
200 |
|
Stages |
200 |
300 |
400 |
|
10 |
100 |
140 |
180 |
|
20 |
550 |
780 |
1010 |
|
15 |
150 |
200 |
260 |
|
30 |
810 |
1150 |
1490 |
|
20 |
190 |
260 |
340 |
|
40 |
1070 |
1520 |
1970 |
Note: Additional paper is required for competitor lists, team results, exception lists, verify lists, final results, etc.
·
Diskettes
Factors that enter into this calculation are:
¨
How many computers
¨
How many backups per day
¨
How many days
Have some extra on hand in case of failure.
·
Power supply
Use power bars to provide enough outlets to each computer and printer. Consider the use of surge suppressors , uninterruptable power supplies, etc. depending on your knowledge of the location.
Location
Determine the location of the "stats shack". Should it be on-site? Or would the match hotel be a better location? There are advantages and disadvantages for each. Consider these factors before making your decision:
·
Work area
Is the work area large enough? Surface areas are required for the computers and printers, handling score sheets, entering scores, etc. You need at least a 3' × 2' surface area for each computer workstation, and a chair for each one. A long narrow table is ideal for handling score sheets.
·
Working conditions
Is there enough light? Is there any air conditioning/heating? Access to stats should be controlled so that you can work in relatively quiet surroundings with few interruptions.
·
Access to facilities
Will you have access to food and beverages? Are there any washrooms close by? The availability of these facilities will influence how you schedule your stats people.
·
Communication facilities
You need to be able to communicate with the match director and/or the range master. If you are off-site, access to a telephone, fax, CB radio or walkie-talkie is essential. You may also need runners/drivers to transport or deliver documents.
Clerical
·
Stationery items
You need pens, note pads, and one or more calculators if the match has Virginia Count stages, where string times have to be added.
·
Filing system
Score sheets that have been entered and verified should be sorted into competitor number within stage, and filed. Any queries which arise from competitors can then be resolved quickly. Some sort of filing boxes or trays are useful for this.
Keep a separate box or tray for anomalies and deferred decisions, such as DQs.
Installation
System Requirements
An IBM PC or 100% compatible with 640K of memory, one floppy disk drive and one hard disk. A 386-based computer (or better) is recommended. The MSS is a database application, and is therefore very disk intensive. A fast hard disk (20ms or better) dramatically improves performance.
A minimum 520K of available memory is required for the MSS to operate. Use MEM or CHKDSK to find out how much available memory you have. They should report a minimum of 532480 bytes free. Any less than this and you're pushing it.
The MSS 6.0 occupies about 1MB on your hard disk when fully installed. This includes the Conversion program and the documentation file, but it does not include any match data or Master database records.
Note: DOS Version 5 or higher is strongly recommended over previous versions. When installed properly on a 386 class computer, it makes significantly better use of available memory.
DOS Environment
In the examples which follow, it is assumed that the MSS is installed on hard disk drive C:. If this is not the case, substitute the appropriate drive letter.
CONFIG.SYS
This is a system file in the root directory of your boot disk. Make sure that this file contains a line which specifies
FILES=20
or a number greater than 20. The MSS may use a lot of open files at any one time. DOS always uses 5 of those files, leaving 15 for the MSS.
PATH
Make sure the MSS directory is in the PATH when the MSS executes. The usual way of accomplishing this is to edit your AUTOEXEC.BAT file in the root directory of your boot disk. You should append
;C:\MSS
to the end of the existing PATH statement.
Example:
PATH=C:\;C:\DOS;C:\WP;C:\123;C:\MSS
If you are concerned about the length of your PATH statement, you can write a batch file (or modify the MSS.BAT file) to setup the path before executing the MSS, and reset it afterwards.
Example:
echo off
echo Loading MSS program - please wait
rem Save current Path
set OLDPATH=%PATH%
rem Set new Path
PATH=%OLDPATH%;C:\MSS
set CLIPPER= v006;e000;
msspgm %1
rem Reset path
set PATH=%OLDPATH%
rem Remove OldPath
set OLDPATH=
set CLIPPER=
The above example uses more space in the DOS Environment, which brings us to our next topic.
DOS Environment Space
Depending on how many Environment string settings you have, you may need to increase the size of the DOS Environment to accommodate the CLIPPER environment string which the MSS batch file sets prior to executing the MSS program. The default size of the DOS Environment varies with each version of DOS.
If, when you try to run the MSS, you see a DOS message
Out of environment space
then you need to increase the amount of space for the DOS Environment. Under DOS 3.2 or higher, you can increase the DOS Environment space by including a SHELL command in your CONFIG.SYS file.
Example:
SHELL C:\COMMAND.COM /P /E:512
This will set your environment space to 512 bytes.
Directory Structure
The MSS is installed into a directory called MSS, created off your root directory. You should organize your matches into separate directories created off the MSS directory.
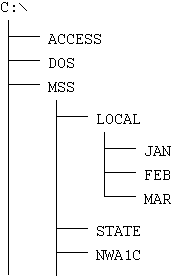
Example:
The diagram on the right shows a portion of the directory structure for disk drive C:. The MSS is installed in a directory named MSS, as usual.
Create a directory named LOCAL to group together all of the local monthly matches. There is a separate directory under LOCAL for each month (JAN, FEB, MAR, etc.).
Create a directory named STATE for the state championship match.
Create a directory named NWA1C for the Northwest Area 1 Championship match.
To help you with managing your match directory structure, the MSS provides the Create New Directory and Change Directory menu options. Both of these are under the Drive & Directory option of the Configuration menu.
Printer Selection
If your printer is not on the pick list of supported printers, check your printer manual to find out which printers it can emulate. Many inexpensive printers are compatible with brand name printers like IBM®, EPSON® and Hewlett-Packard®. If there is no hardware means of putting the printer into emulation mode, by pressing a button for instance, then you may find that the printer requires a special command to enable it to emulate the brand name printer. This is usually done in the form of a sequence of characters which is sent to the printer to put it into emulation mode.
The MSS supports this through the Setup String on the Printer Selection screen. Whatever you have keyed into the setup string is the first thing sent to the printer each time a report is printed. All you have to do is key in the sequence of characters that will put your printer into emulation mode.
The only difficult part about this is dealing with control characters which aren't on your keyboard. For example, most printers require an ASCII escape character as the first character in the command sequence. This is not the same as the Esc key on your keyboard (a source of much confusion for many unsuspecting users). The escape character has a decimal value of 27. Your printer manual may show the escape character as CHR$(27), which is how it is coded in the Basic programming language.
You key an ASCII control character into the Setup String by typing a backslash (not a forward slash) followed by the three digit decimal number for that character. So an escape character would be keyed in as
\027
You can use the chart on the right to map an ASCII control character to the setup string required by the MSS.
|
Control character |
Number Dec Hex |
Setup string |
|
NUL
|
0 00 |
\000 |
|
SOH
|
1 01 |
\001 |
|
STX
|
2 02 |
\002 |
|
ETX
|
3 03 |
\003 |
|
EOT
|
4 04 |
\004 |
|
ENQ
|
5 05 |
\005 |
|
ACK
|
6 06 |
\006 |
|
BEL
|
7 07 |
\007 |
|
BS
|
8 08 |
\008 |
|
HT
|
9 09 |
\009 |
|
LF
|
10 0A |
\010 |
|
VT
|
11 0B |
\011 |
|
FF
|
12 0C |
\012 |
|
CR
|
13 0D |
\013 |
|
SO
|
14 0E |
\014 |
|
SI
|
15 0F |
\015 |
|
DLE
|
16 10 |
\016 |
|
DC1
|
17 11 |
\017 |
|
DC2
|
18 12 |
\018 |
|
DC3
|
19 13 |
\019 |
|
DC4
|
20 14 |
\020 |
|
NAK
|
21 15 |
\021 |
|
SYN
|
22 16 |
\022 |
|
ETB
|
23 17 |
\023 |
|
CAN
|
24 18 |
\024 |
|
EM
|
25 19 |
\025 |
|
SUB
|
26 1A |
\026 |
|
ESC
|
27 1B |
\027 |
|
FS
|
28 1C |
\028 |
|
GS
|
29 1D |
\029 |
|
RS
|
30 1E |
\030 |
|
US
|
31 1F |
\031 |
A setup string can also be used to change the font, spacing, orientation etc. of the reports printed by the MSS.
Example 1.
To make use of the MSS Wide Print feature on an EPSON® compatible 80 column dot matrix printer, you could use the following setup string to put the printer into compressed mode.
\027@\015
The string \027@ is an escape control character followed by an @ character, which resets the printer to its default state. The \015 string is a shift in control character, which puts the printer into compressed mode.
Example 2.
The following setup string allows HP LaserJet® printers which support font auto-rotation (IIP, III etc.) to print wide reports in landscape orientation. Note that the setup string must be typed in exactly as shown.
\027E\027&l1o8D\027&a5L\027(s0p12h10v0s0b3T
The character sequence after the first ampersand is a lower case letter L, followed by a numeric 1, followed by a lower case letter O.
Note: For the above examples to work, you must also set the Wide Print field to Y in the Printer Selection screen.
Match Setup
Create New Directory
Before you setup a new match, create a separate match directory for it. From the MSS Main menu, select Configuration, then select Drive & Directory.
Check if the current directory is the one you want the new directory to be under. The path name of the current directory is always displayed on the MSS menu screen, on the left hand side just below the version number. If you don't want the new directory to be created under the current directory, then select the Change Directory option from the menu and navigate to the directory you want the new one to be under. When you're done, return to the Drive & Directory menu.
From the Drive & Directory menu, select Create New Directory. The MSS automatically fills in the current directory path for you in the input screen, and positions the cursor at the end of the string. Now all you have to do is type a backslash (\) and the name of the new directory.
You should use 1 to 8 alphanumeric characters for the new directory name. Choose something that you can easily associate with the match.
Example
You are currently in the MSS directory, and you go into the Create New Directory screen to create a directory for the Northwest Area 1 Championship match. The MSS will display this path string:
C:\MSS
Now all you do is type \NWA1C so that the path string looks like this:
C:\MSS\NWA1C
Press Enter and the MSS will prompt you to confirm that you want to create the new directory. Press Enter again and you will be asked if you want to change to the new directory. Answer Y to the prompt and you are now in the newly created directory for the match.
Warning: The MSS relies on DOS to validate the name of the directory you specified. Beware of the following pitfalls:
·
If you put spaces in the name, the new directory will be created, but you won't be able to use it.
·
If you use more than 8 characters, the name will be truncated.
·
If you type a period in the name, only the next three characters after the period will be used. The rest will be truncated.
Different Ways to Setup Stages
There are different options in the MSS for:
·
Initially setting up stages for a match
·
Adding stages to a match
·
Changing a stage in the match
Initial stage setup
Choose the Setup option from the Main menu, then Stages, then Initialize. This will give you a screen for stage 1 of the match.
Add as many stages as you like. You don't have to add them all, but the stages are numbered consecutively. e.g. If stage 3 is not finalized yet, you cannot skip it and go on to stage 4. You have to enter something valid for stage 3.
After initial stage setup, you should choose the Capacity option to specify how many competitors you expect at the match.
Adding stages to a match
Choose the Setup option from the Main menu, then Stages, then Append. This will give you a screen for the next stage after the last one currently defined for the match. e.g. If the match currently has 10 stages defined, the input screen will be for stage 11.
You can always add stages to a match, even to a match in progress.
Changing a stage in the match
If you want to change the details of an existing stage in the match, you cannot do this through the Setup menu. Choose Match from the Main menu, then Registration & Maint, then Modify Stage. The MSS will warn you if the change you are making will affect any scores which have already been entered.
After you have finalized the stages for the match, you should print a stage profiles report and check it to make sure the details of each stage are correct.
The stage profiles show the relative weight of each stage as a percentage of the total points in the match. This is considered useful information by most competitors, so include it in the match copy.
Preparing Score Sheets
The MSS will print score sheets for each stage in the match. However, the score sheets which the MSS produces are quite basic. If you have a large or important match, you may want your score sheets to be more closely identified with the match.
If you have word processor skills, or you know how to make some other presentation software perform magic, you can use the score sheets which the MSS produces as a starting point for your own.
A technique that some people use is to print the score sheets to disk, then import the resulting files into their favorite presentation program. If you take the time to develop a few handy macros to do the bulk of the file manipulation, you can use this technique many times over.
The MSS will print the score sheets in separate files if you request the stages individually, or in a single file if you specify ALL.
·
Individual files have the filename SHEETx.PRT
where x is the stage number.
·
The single file with all the score sheets has the filename SHEETALL.PRT.
After you have prepared the score sheets to your liking, consider the following when you take them to the print shop for reproduction:
·
If you don't have too many stages, color coding the score sheets can be a tremendous help for everyone, especially when handling score sheets in the stats shack. If you cannot assign an individual color to each stage, you may find it useful to employ the same color coding as you're using for your distribution of stages among multiple computers (see the section on Slave Data Entry.)
·
Use NCR paper, so that the competitor gets an accurate duplicate of the score sheet. It saves time on the range as well. People won't have to wait while the competitor searches for a pen and paper to write down a copy of his/her scores.
Score Sheet Distribution
There are basically two ways you can distribute score sheets for the match.
1. Package them by competitor, and include them in the competitor's kit.
This requires less work up front on the part of the match organizers, but it can (and usually does) lead to problems on the range during the match. Competitors sometimes forget their score sheets, or they bring the wrong ones to a stage.
2. Package them by squad and stage, and deliver the packages to the range.
This requires a lot more work up front. All competitors have to be squadded in advance, so that the score sheet packets can be prepared before the match commences. Last minute changes require new score sheets to be cut and delivered to the range.
If you enter a squadding schedule into the MSS, which in itself can be quite time consuming for a large match, then you have the option of printing competitor labels in stage and squad number sequence. This sequence is more suitable for this kind of score sheet distribution than printing the labels in competitor number sequence.
As with most things in life, the choice comes down to tradeoffs. Option 1 makes it easier on the match organizers, and provides greater flexibility, but places more responsibility on the competitors. Option 2 puts less of a responsibility on the competitors, but requires more on the part of the match organizers. You have to ask yourself "who is the match really for?" We all know the answer to that question.
Registering Competitors
Most MSS stats officers will attest that it is worthwhile taking the time to create and maintain a Master database of shooters. Registering competitors for a match then becomes a simple point-and-shoot operation.
Here are some points of clarification about registering shooters from the Master database.
·
The MSS remembers the order in which you registered people, and will import them into the match in that order. However, you should not confuse the registration sequence number shown in the Browse Registrations screen with the competitor number. These are two entirely different things.
·
If you register someone, then register some more people, then you unregister the first person, then register him/her again, he/she goes to the end of the registration list. Don't be alarmed by the resulting gap in the sequence numbers.
·
You don't have to register everyone before doing an Import into the match. You can go through the registration and importation cycle as many times as you wish. The newly registered and imported shooters will be added to the end of the current list of competitors.
·
If you delete a competitor from the match, that person's competitor number becomes available for reuse. If you subsequently register and import some people from the Master database, that competitor number will be reused. Don't delete competitors from the match if you don't want their competitor numbers to be reused. Wait until the end of the match, or until there is no possibility of any new competitors being added, then delete any unwanted competitors.
If any of the following competitor attributes are required:
·
Squad number
·
Team number
·
Affiliation number
they must be entered through the Modify Competitor menu under the Registration & Maint option of the Match menu.
If you are not entering chronograph results, then be sure to review and revise, if necessary, major and minor power designations. You may want to do this anyway, as some competitors get quite agitated if they see the wrong power designation on interim results.
Printing Match Lists
When everything is settled and all competitor information is complete, print final copies of the following lists:
·
Alpha list (competitors in name sequence).
You sometimes need to look up a competitor's name to find out his/her competitor number.
·
Numeric list (competitors in competitor number sequence).
Converse of the first point.
·
Team list (a list of competitors by team), if teams have been assigned.
·
Squad list (competitor list by squad number).
This listing can help if you have to recover match data to a previous point of consistency. More on this in the section on Backup Strategy.
Provide each range crew with a copy of the squad list, so that they can see who the members of a squad are without shuffling through score sheets.
Backup Strategy
Everyone Knows Murphy's Law
Experienced computer users know only too well that Murphy watches, and he will pick the worst possible time to strike. If you have a good backup strategy, and you faithfully and religiously follow it so that you are virtually assured that you can recover from any hardware, software, or human error in a reasonably short time — then nothing will happen.
If, however, you take chances and try to save time by not bothering with any kind of backup strategy other than "do it all over," then when things are absolutely at their most critical and vulnerable state — that's when Murphy will strike.
Establishing a Point of Recovery
The purpose of taking a backup is to establish a point in time such that if anything "goes wrong" afterwards, you can recover everything back to how it was at that point in time and go forward from there. Taking a backup is the act of establishing another point of recovery, also referred to as a checkpoint.
The formula is simple. The longer the backup intervals, the longer it takes you to recover. Conversely, the more frequently you take a backup, the less time it takes to recover.
Let's look at the simplest strategy first. No backups taken at all, before or during the match. With this strategy, you have a single point of recovery — right from the very beginning. In the case of a complete hard disk failure, you would have to setup the match all over again, and reenter all of the scores. If this were to happen on the last day of a major match, it would be a total disaster.
A more reasonable strategy is to have several points of recovery during the life of the match. How many should you have? The answer to that question should be determined largely by the answer to another. How much time you can afford to do a recovery?
Other factors influence your backup frequency, but by far the most important concern should be how long it would take to recover. By comparison, it takes much less time to do a backup.
Using the MSS Backup Option
This option is provided to make taking a backup of match data more convenient. Note however that it backs up match data only. It does not backup the MSS program and system files.
The MSS backup is intended to be used in addition to, not instead of, a system level backup. It is up to you what tools or techniques you use to do a system level backup. Most people invest in one of the specialized third-party products, such as PC TOOLS® or the NORTON BACKUP® program. For people of limited means, the latest version of DOS now has a very capable and very usable backup and recovery program bundled in with it. So there is no reason for not having a system level backup.
Recommended Strategy
This strategy addresses the recovery of match data, and assumes that you have a system level backup strategy which provides a recovery point in the case of total failure.
Usually, you are entering data from documents, like match application forms or score sheets. You need to coordinate the documents with the backups. If you have to recover data back to a previous checkpoint, you need to know what data has to be keyed back in to the system. This is where a squad list and a squadding schedule can come in handy.
Before the match
Take a backup after each significant amount of data input. Specifically, you should backup the match data to a floppy after:
·
Creating the match and entering the stage profiles
·
Registering and importing a significant number of competitors
·
Updating competitor information with squads, affiliations, teams, tags, contest divisions, power categories, etc.
Note: An MSS backup does not backup the Master database. If you have made significant changes or additions to it, back it up manually or with your system level backup.
During the match
Take a backup after:
·
Final registration and last minute updates.
·
After each batch of score sheets has been entered, or at least twice a day.
·
At the end of the day, after calculating and printing match results.
Diskettes
Use dedicated, preassigned diskettes for match data backup. Label the diskettes so that they can be readily identified.
Example
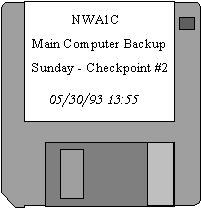
Don't overwrite a prior backup diskette when taking another backup. Murphy would love to strike while you're taking a backup!
Recovery After a Failure
The MSS provides no facility or option for doing the actual file recovery. It's purely a manual operation. What action is taken depends to a large extent on the nature of the failure, but a word of caution is in order here.
The MSS is a database application. There is a large number of files which are all interrelated in some way. Be very careful about recovering individual MSS files from a backup. You should not attempt this unless you are absolutely certain that you know what you're doing.
In particular, you should be aware that, after stage results have been calculated, each stage data file has a corresponding index file. The data file has an extension of DBF, while the index file has an extension of NTX.
Example
Stage data file Index file
STAGE1.DBF STAGE1.NTX
STAGE2.DBF STAGE2.NTX
etc.
These files always go together. If you recover one without the other, the results are unpredictable.
Do not recover an individual stage if you have made any significant changes to competitors since the backup was taken. This includes adding or deleting competitors, entering DQs, changing a power category from major to minor or minor to major (either directly or as a result of entering chronograph results)… the list goes on.
We strongly recommend that recovery be an all or nothing proposition. In other words, you should recover all of the match data from a backup, or none of it. This can seem like a lot of work if only one stage file has been damaged. The problem is that the stage files are kept in synchronization with the others by the MSS. If you recover an individual file, you could put the match data into an inconsistent state.
Recovering Match Data
Here is the recommended set of steps required to recover match data from a previous backup.
1. Exit the MSS if you have not already done so.
2. Change to the match directory, if you are not already in it.
Example
CD \MSS\NWA1C
3. Insert the backup disk into the appropriate drive and copy all files from it. If the floppy disk is in drive A:, you would enter:
COPY A:*.*
Now everything is back to how it was when you took the backup. This is your point of recovery. You need to reenter all of the data which you entered after that point.
4. Use the squadding schedule to determine which stages for which squads need to be reentered. This is why it's important to have the backup disks clearly marked so you can identify the point in time to which you have reverted. You now know what batches of score sheets arrived after that point in time.
5. Use the squad list to determine whose score sheets to pull from the filed score sheets for each of the stages.
6. Reenter those score sheets in the usual way. Be sure to do the verification steps as well.
7. If you are going back further than the immediately preceding check-point, be sure to take the intervening backups at the appropriate point in time.
Data Entry Routine
A General Approach
A data entry routine should be followed for each batch of score sheets which has to be entered. If you get into the habit of using the same routine every time, it becomes automatic, smooth and efficient.
A recommended routine is presented here for people who are looking for a place to start. However, if you have your own routine, and it works for you, then by all means stick with it. The important thing is to have a routine, and not just wing it.
A Recommended Routine
The steps to be followed are:
1. Separate the score sheets into piles by stage. In a large match, the more hands you have helping here, the better. The score sheets do not have to be sorted into competitor number order at this point. The MSS allows scores to be entered in random order.
2. Add up the scores in each of the columns and write in the totals. During this process, check for completeness. For each stage on the score sheet (except for fixed time standards):
·
Each target should have the required number of hits and misses.
·
The total hits and misses should equal the minimum rounds.
·
The time should be present. For Virginia Count stages, use a calculator to add up string times.
Sideline any anomalies (DQs, missing scores/times/signatures), do not try to resolve them at this time.
3. Check the finished piles. A different person should go through the score sheets which someone else completed in step 2. The checker should go through the same process as step 2, verifying that the totals are correct. Write any corrections on the score sheet.
4. Key the scores into the computer. Enter scores by stage for score sheets which have a single stage on them. Enter scores by competitor for score sheets which have more than one stage on them.
5. Print verify lists for all stages which have been entered. Accept the default option of printing only those scores which have just been entered.
6. Check the verify lists against the score sheets to make sure they have been entered correctly. A different person should go through the score sheets which someone else entered. At this time, the score sheets should be sorted into competitor number order, since the verify lists are printed in that order. Use a sheet of paper or a straight edge of some kind to cursor through each line on the verify list. For each score sheet:
·
Match the competitor number on the score sheet with the competitor number on the verify list.
·
Make sure the competitor name on the score sheet is the same as on the verify list.
·
Match the totals and the time on the score sheet with the corresponding columns of the verify list.
·
Check off the line on the verify list. If there is a discrepancy, turn the score sheet sideways and mark an X on the verify list.
7. Reenter any scores for which errors were found.
8. Print verify lists for corrected scores and check them.
9. Enter any chronograph results or competitor changes. Defer DQs until you hear from the match director or range master. Remember, the MSS cannot unDQ a competitor.
10. Backup the match to a diskette. Just press F7 on the Match menu. If you are following the backup strategy recommended in this document, make sure you are using the right diskette. In any event, the diskette should be properly labeled with the date and time.
11. Calculate and print results, if required.
12. File the entered score sheets with the others that have been entered, in competitor number order by stage. This makes it a whole lot easier to handle any competitor queries later on, especially towards the end of the match!
Local circumstances may require you to make changes to this routine, and you may find your own improvements and variations. Incorporate these changes as required, but don't sacrifice accuracy for speed. A stats officer has the responsibility of insuring that all competitor scores are entered accurately and completely. There is nothing that can discredit a match more than "questionable results".
Printing Results
Posting Interim Results
Posting results twice a day seems to be the most popular and practical frequency. Print stage results and match results at the midpoint of the day (not necessarily noon) and at the end of the day. Post the results on the range at a central location and, if applicable, at the match hotel.
In a large match, finding a surface area big enough for posting the results can sometimes be a problem. You may have to scout this out in advance, and obtain suitable boards or other equipment to hold the results.
Using Queued Printing
In a large match, printing two copies of stage results can take a long time. If you have to wait for the printing to finish before you can enter more results, your throughput is impacted. You can carry on entering results if you have a print spooler, which allows printing to carry on as a background activity while you do other things in the foreground.
Few PC users realize that DOS comes with its own print spooler — a program called PRINT.EXE which will allow printing to be done in the background while other things are being done in the foreground. The DOS PRINT program is a TSR (Terminate and Stay Resident) which you can start from the DOS prompt. The MSS will recognize its presence and make use of it if you so choose.
You can start the DOS PRINT program by entering
PRINT /D:PRN /Q:15
at the DOS prompt. You may want to use a batch command file to do this. The MSS comes with a file called SPOOL.BAT which can be used for just this purpose.
When you request the MSS to print a report to disk, if the PRINT program is resident the MSS will display the following prompt:
Submit print file to Print Queue?
The default response is no, but if you answer yes, then after the report has been printed to disk, it will be submitted to the Print Queue. If your printer is on-line and ready, printing will begin immediately. You can then carry on using the MSS, even though the report is printing.
You can queue up to 15 reports. If you want to queue more than that, change the /Q: parameter on the command line shown above. You can manipulate the print queue by using the Print Queue option under Utilities in the Match menu. See the MSS documentation for details.
This feature is most effective for allowing printing to continue while doing data entry. It is not so effective when calculating results or doing a backup, because the foreground activity slows down the background printing.
Making Final Results Available to Competitors
Providing each competitor with a printed copy of all the results is not only an expensive proposition, it can be completely impractical from a printing point of view.
One technique which was used very successfully at the 1992 North American Championship match, was to print all the results to disk, copy the print files to a diskette and then duplicate that diskette for those competitors who wanted a copy of the results.
Copying disks is timing consuming, but it is much quicker than printing the results. If a reasonable fee is charged, it can turn out to be a good contributor to match funds as well.
Slave Data Entry
Dividing the Workload
Slave Data Entry allows more than one person to be entering scores at the same time, by dividing the workload among multiple computers — a main computer and from 1 to 9 slave computers. This allows stage data entry and printing to be done on up to 10 computers simultaneously.
The main computer has the full MSS program installed on it, and is used to do all the things you normally do with the MSS during a match.
Each slave computer has the SDE program installed on it, which is a subset of the full blown MSS program. It can only be used to enter, calculate and print stage scores.
During match setup, you specify the range of stages to be distributed to each slave computer for data entry. The stage data is transferred between the main computer and its slaves using a technique which is known in the computer industry as SneakerNet.
What is SneakerNet?
Slave Data Entry does not require an expensive networked computer configuration. The only kind of network required is SneakerNet (referring to the act of running back and forth between computers). The computers are not linked electronically, they are linked by copying information from one computer on to a floppy disk, then taking that floppy to another computer and copying the information into that computer. When using Slave Data Entry, there are two situations where this is kind of data transfer is done.
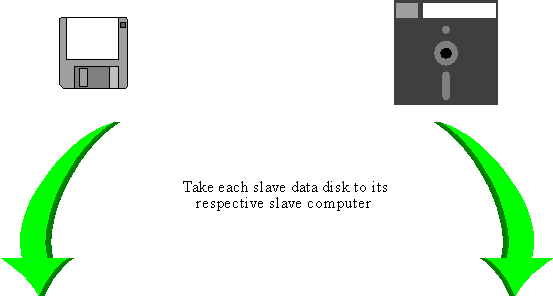
1. Sending out stages to slaves.
On the main computer, you select the Outgoing option of the Utilities menu to create a slave data disk for each slave computer. Each data disk contains the stages which have been assigned to that slave computer. You take each data disk to its respective slave computer. On each slave computer, you select the Incoming option to read in the data disk.
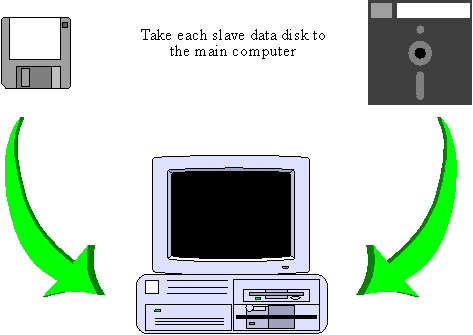
2. Bringing in stages from slaves.
On each slave computer, you select the Outgoing option to create a slave data disk for the main computer. These disks are taken to the main computer, where you select the Incoming option of the Utilities menu to read in each of the slave data disks in turn.
These two activities are summarized on the next two pages.
Sending Out Stages to Slaves
Select the Outgoing option from the Utilities menu on the main computer


Bringing In Stages from Slaves


Select the Incoming option from the Utilities menu on the main computer
The main computer will prompt you for each slave data disk in turn
When to use Slave Data Entry
You need more than one computer for data entry if your score sheet throughput exceeds 1000 per day (see Calculation of Score Sheet Throughput in the section on Planning). Individual score sheet throughput is usually between 50 an hour (slow data entry operator) to 100 an hour (fast data entry operator).
Identifying the Required Resources
Once you have decided how many computers you need (or how many you would like to have) you need to determine the availability of the following resources:
Computers
What computers are available to you? In addition to the considerations mentioned in the section on Planning, you should consider the following:
·
Diskette drives
Make sure the main computer has a compatible diskette drive for each slave computer. You may need both 3½" and 5¼" drives.
·
360KB disks in 1.2MB drives
A 360KB disk which was written on by a 360KB drive can be read reliably by a 1.2MB drive. However, a 360KB disk which was written on by a 1.2MB drive cannot be read reliably by a 360KB drive. If you insist on mixing media, use the following guidelines to minimize the chances of failure.
1. Get some brand new, unformatted 360KB disks and format them at 360KB in the 1.2MB drive. Use these disks (and only these disks) when writing at 360KB in a 1.2MB drive. Do not allow these disks to be written on in a 360KB drive.
2. Format some 360KB disks in the 360KB drive. Use these disks (and only these disks) when writing in a 360KB drive. Do not allow these disks to be written on in a 1.2MB drive.
If your main computer has a 1.2MB disk drive and your slave computer has a 360KB disk drive:
¨
For an outgoing on the main computer, use the disks from item 1 above. The main computer will write on these disks. The slave computers will only read from them.
¨
For an outgoing on a slave computer, use the disks from item 2 above. The slave computers will write on these disks. The main computer will only read from them.
·
Processing speed
Always use the fastest computer as the main computer. Slaves should, ideally, be equally matched to each other, but this is less important than matching printer speed.
·
Numeric keypad
Entering scores requires a numeric keypad for efficiency. Laptops and notebook computers usually have a numeric keypad overlaid on the main keyboard. This is not as effective as a genuine separate keypad. Throughput will likely be impacted.
·
Attached printers
The time taken to print stage results can be greatly reduced if each computer has a printer attached. Ideally, the printers should be about equal in speed. A very slow printer might actually slow things down unless you know how to spread the printer workload manually.
People
You need as many data entry operators as you have computers, all entering results at the same time. Arrange the stats work schedule accordingly. There is no point in having more slave computers than there are people to operate them.
Power supply
You need a stable power supply with sufficient outlets. Use power bars to take the power to each workstation, which may need as many as three outlets — one each for the computer, monitor and printer.
Work areas
The more computers and people you have, the larger the work area you need. This applies to both room size and surface areas. The minimum surface area for a workstation is 3' x 2'. Cramped or overcrowded conditions contribute to errors.
Setting Up the Computers
Visibly identify the main computer and the slaves. For example, place a sign on top of each monitor. Identify the slave computers by number. Use color coding also, if appropriate.
Color coding
It's well known that color coding is a useful visual aid for most people. Use color coded signs and diskettes for each computer, if you can find them and your budget allows.
Main computer
Specify the distribution of stages on the main computer. Divide the stages in approximately equal proportions among the slaves and the main computer. Note that the number of rounds or targets in a stage is not a significant factor in the distribution, since you always enter totals for each stage.
·
Select the Setup option from the Main menu, then Stages from the Setup menu, then Slave Data Entry from the Setup Stages menu.
·
Enter the range of stages to be assigned to each slave computer. The stages must be assigned in ascending order for each slave. Because you specify a range of stages (e.g. from stage 6 to stage 10), the stages assigned to a particular slave are contiguous. However, they do not have to be contiguous from one slave to the next. i.e. There can be gaps in-between the slaves.
Any stages which are not assigned to a slave are, by default, assigned to the main computer. The stages for the main computer, therefore, may not be contiguous.
Example 1.
In a 15 stage match with 2 slave computers:
·
Stages 3-7 are assigned to slave #1.
·
Stages 11-15 are assigned to slave #2.
This means that the main computer will be used for stages 1-2 and 8-10.
Example 2.
In a 20 stage match with 3 slave computers:
·
Stages 2-5 are assigned to slave #1.
·
Stages 8-12 are assigned to slave #2.
·
Stages 15-19 are assigned to slave #3.
This means that the main computer will be used for stages 1, 6, 7, 13, 14 and 20.
Slave computers
Install the slave data entry program (SDE) on each slave. You only need to do this once for a particular match. Follow the instructions in the MSS documentation.
The Routine for Slave Data Entry
Finalize all registration on the main computer. When the score sheets start rolling in you will get into your data entry routine.
1. Press F7 while on the Match menu to backup all the match data. This gives you a point of recovery, as described in the section on Backup Strategies.
2. Select the Utilities option from the Match menu, then the Outgoing option from the Utilities menu. The main computer will prompt you for a data disk for each slave in turn.
Note: You can overtype the disk drive letter in the prompt for the floppy disk if you need to.
3. Take each data disk to its respective slave computer and select the Incoming option (just press F1). Again, you can overtype the disk drive letter in the prompt for the floppy disk if you need to.
4. This step usually includes all of steps 1-8 listed on page 19 of the Data Entry Routine section. Each data entry operator enters the scores for the stages assigned to that particular computer. When all the scores have been entered, verification lists can be printed on each computer, and the scores verified. If one or more of the slave computers has no printer attached, the verification step for those stages can be done in step 9 below.
5. Scores can be calculated on all computers, and printed if required on those which have printers attached. For those that don't, printing can be done in step 9 below.
6. Do a backup on each slave that has a hard disk, by pressing F7. Use backup diskettes for this, not the data disks for transferring data between the main computer and the slave.
7. Select the Outgoing option on each slave (just press F2). When you are prompted to insert a data disk, you can overtype the disk drive letter, if required. Take the resulting data disks from each slave to the main computer.
8. Select the Utilities option from the Match menu, then the Incoming option from the Utilities menu. The main computer will prompt you for each slave data disk in turn. Again, you can overtype the disk drive letter in the prompt for the floppy disk if you need to.
9. For those slave computers which have no printer attached, you can do verification and correction of their stages. You can then print their stage results, if needed.
If you have any updates for the main computer, like chronograph results, competitor changes etc., you can enter these now. Then you can calculate and print match results if required.
Now you wrap around to step 1 again. In actual practice, you will usually find yourself waiting for score sheets at step 4. This means either you are managing the throughput very well, or the score sheets are late!
Recovering Slave Data
There's an additional consideration for recovery of match data on slaves. An incoming on a slave computer is like a recovery, except it's a recovery to a later point in time, established by the main computer.
If you have to do a recovery on the main computer, then any subsequent outgoing to the slaves will bring their match data in line with the main computer. This eliminates the need to recover match data on the slaves.
As mentioned before, system level recovery is a different matter.
Try it Out at a Local Match
If you haven't used Slave Data Entry before, and you perhaps feel a little intimidated by it, why not try it out at a local match first? A small, four stage match is an ideal place to start. Distribute two of the stages to a slave computer, and go through the routine given above. Discover for yourself, first-hand, what is involved in using multiple computers to score a match.
If you do this exercise a few times, then scoring a large match with multiple computers will seem familiar to you — only on a larger scale than usual.
Go ahead! Give it a try!